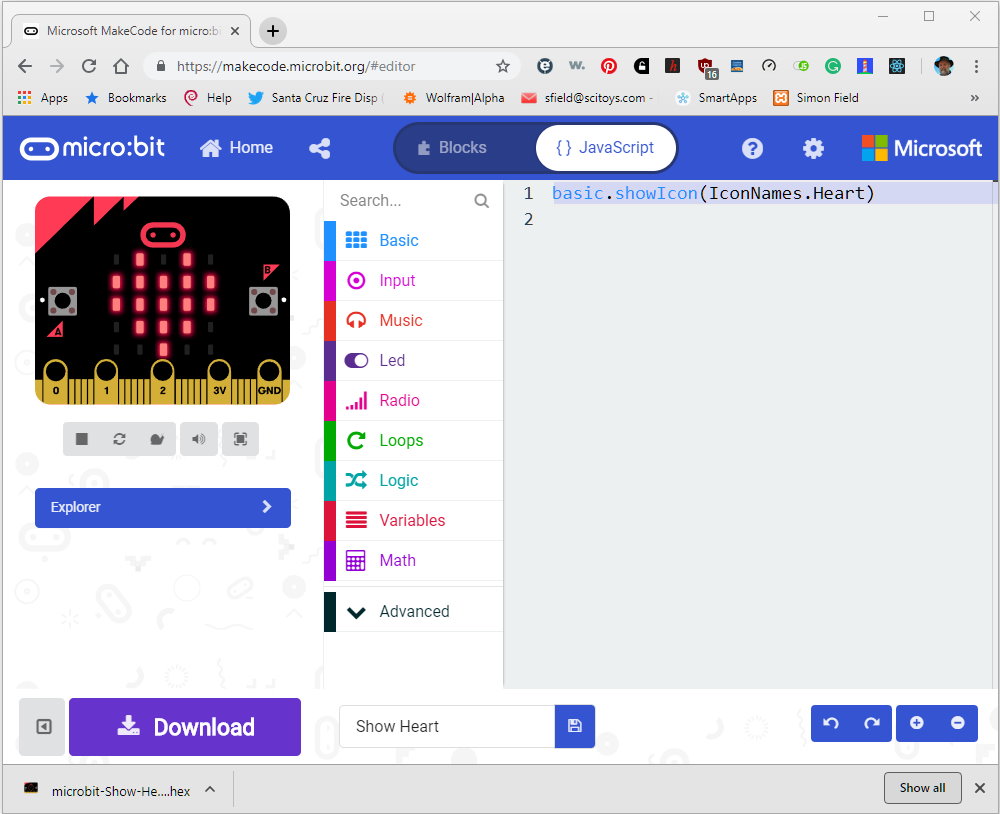
Now we can click on the "{} Javascript" button to see what our program looks like in Javascript.

Not surprisingly, the simplest program I could think of is pretty short. A single line of text. We have an object called "basic" that the Micro:bit already knows about. It has a method on it called showIcon. That method takes an argument inside its parentheses which is the Heart member of the object IconNames.
The Micro:bit already knows about a number of objects that we don't have to define ourselves. We'll see several of them as we play with our blocks and look underneath at the Javascript code that makes them work. IconNames is an object that knows all of the names of the built-in icons, such as Heart. The "basic" object is an object that has methods that implement each of the blocks in the Basic category.
Go back into Blocks mode and pull down the menu next to the little heart icon to see the list of built-in icons. Hover your mouse over each one to see its name pop up.
![]()
Let's look at a more interactive program:

Here we have selected some items from the Input category (note the color of the blocks matches the color of the category "Input"). One of them is the "on button" block. We get to select which button we care about by pulling down the menu. We want one for button A and one for button B. Another input block is the "on shake" block. Actually, as we can see if we pull down its menu, we can do something on 11 different motion related things (called Gestures), such as tilt left, or tilt right. But for this program, we will leave it on the default mode, which is "shake".
Inside the "on button A pressed" input control, we place a "show icon" block showing the "yes" icon, which is a check mark. Inside the B button control, we show the "no" icon, which is a big X.
Inside the "on shake" control, we drop a block we haven't used before. The "show leds" block allows us to set the lights to any pattern we wish, just by clicking on one of the dark squares in the block to make that light turn on. Click again to make that light turn off. In this program, we want all of the lights to go off when we shake the Micro:bit.
Download the program to your Micro:bit (or just use the simulator if your Micro:bit hasn't arrived in the mail yet) and press the A button (the one on the left). A check mark shows on the lights. Shake the little computer and the lights go out.
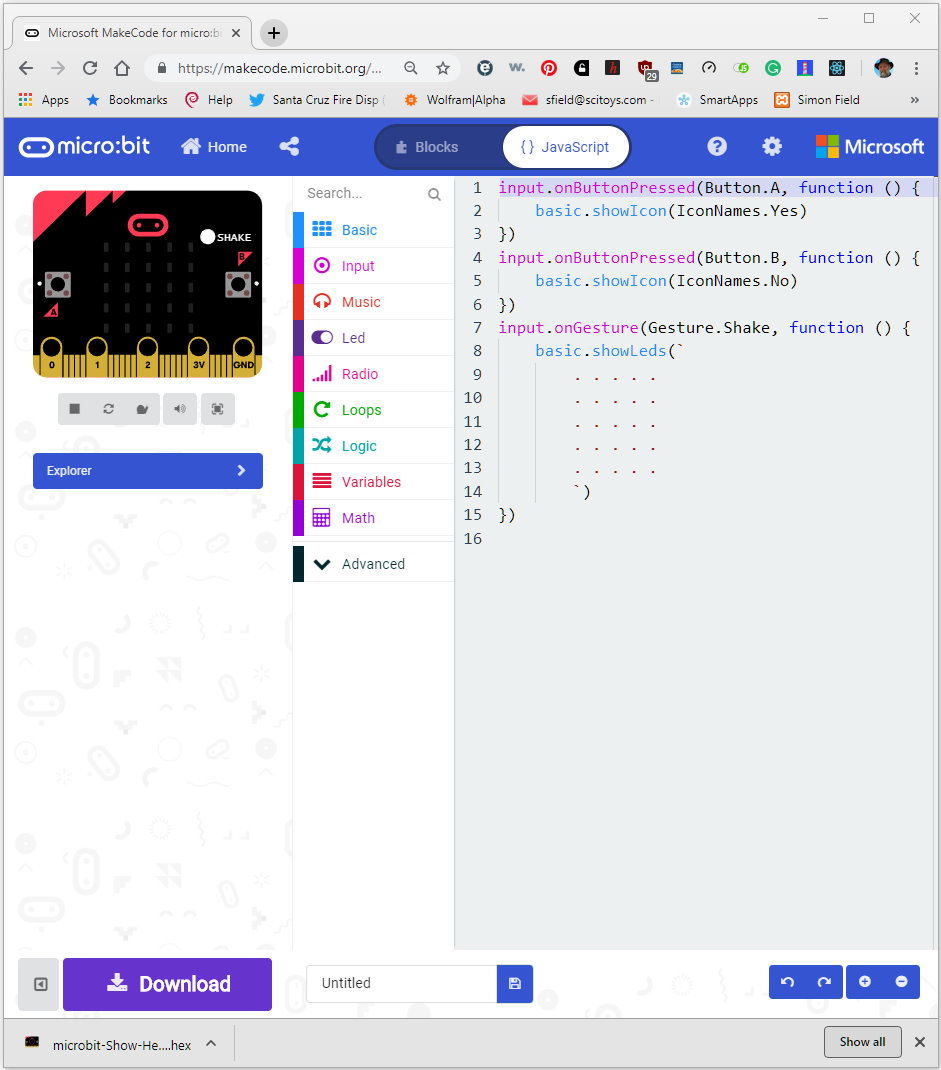
Now let's look at the Javascript code:

This is a little more complicated than our first program!
But wait. Actually, there is only one new concept here. We have an example of one of Javascript's central ideas, the function.
Yes, we have discovered a new object, called input, and some new methods on that object, such as onButtonPressed, and onGesture. And, ok, another couple of objects, Button and Gesture, and their members A, B, and Shake. But we already know about objects, methods, and members.
What this code is showing us is that the onButtonPressed method takes two arguments, separated by a comma. The first is which button to care about. In the first case, it is Button.A. The second argument looks like this:
function () {
    basic.showIcon(IconNames.Yes)
}
A function is a collection of statements. The statements are executed when the function is called. The curly braces define where the group of statements begin and end. If we want a whole bunch of things to happen when button A is pressed, we can add those things to our function. In this case, we only want to do one thing, so we only have one statement inside the curly braces of our function.
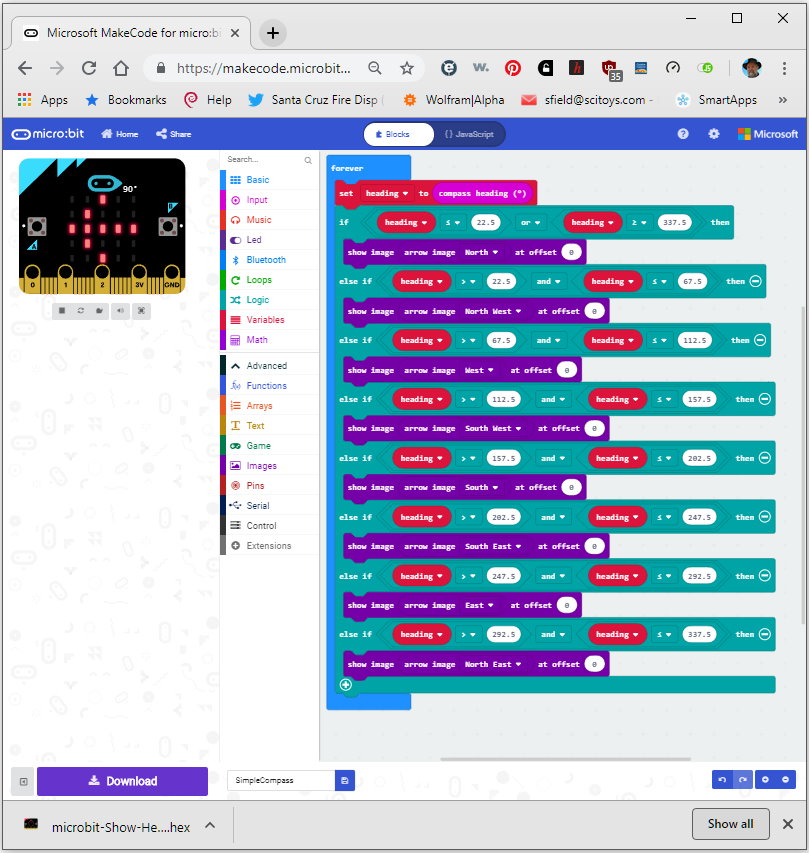
Now let's dive right into a more complex program. It may look daunting at first, but it is mostly repetitive, so we will only need to learn a few new concepts:

We can begin to see one of the drawbacks to the Blocks representation. Am I really going to make you drag all of those blocks into place and change all of those little text boxes to have all of those numbers?
No.
I'm going to show you the Javascript version of the program, and you can copy and paste it from our website into the Javascript window of the Micro:bit programming page.
Before we do that, however, let's look at the new blocks.
We have the "forever" block. That block runs the code inside it over and over again, until, well, forever. Or until the battery dies.
The first block inside the forever block is red, just like the category Variables in the toolbox. That means we are creating a variable, which is a named place to put some information. Our variable is called "heading" and it will hold the compass heading that we get from our next new block, and Input block (note the color) that uses the Micro:bit's magnetometer chip to tell us where magnetic North is. Magnetic headings are in degrees of a circle, and North is both 0 degrees and 360 degrees. East is 90 degrees, South is 180 degrees, and West is 270 degrees. Don't bother memorizing them, we will encode them in our program, and let the computer memorize them for us.
The next new block is the "if" block. It is in the Logic color. If the heading is less than 22.5 degrees or more than 337.5 degrees, we will say that is close enough to North to call it North.
The "if" block controls another new block, the "show image" block. The Micro:bit knows how to draw arrows pointing at eight compass points (e.g. North, North East, East, etc.).
That is all of the new stuff. The rest of the program is just a repeat of the first "if", but for the other 7 compass points.
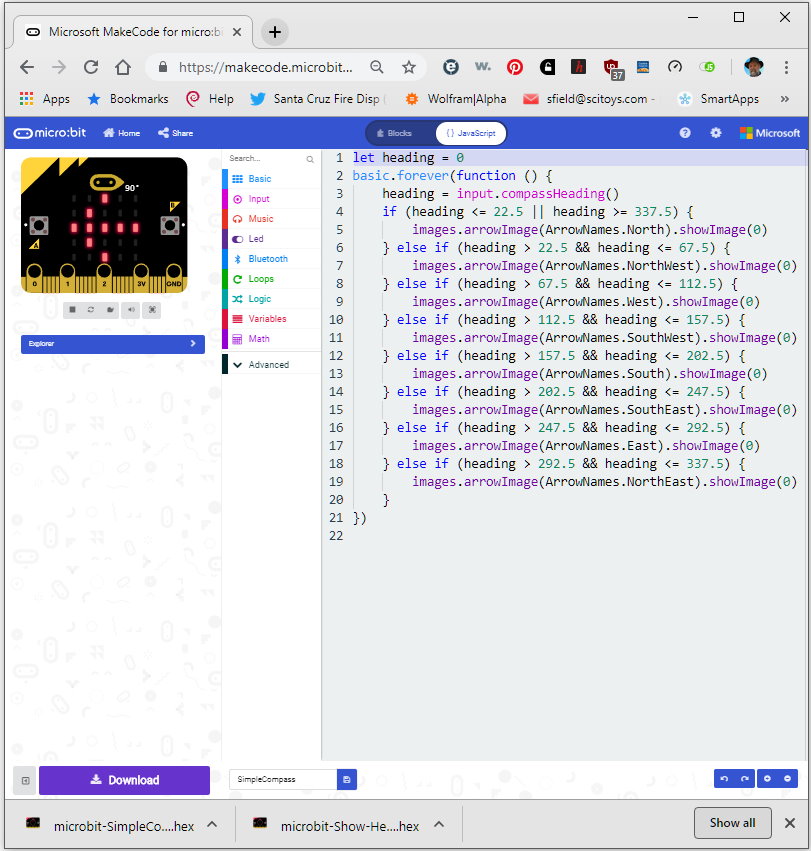
In Javascript, the code is a little more compact:

I'm going to repeat it here as text. That will let you copy it from the website and paste it into the Javascript section of the programming page. Then you can either download it, or you can look at the Blocks version of it.
let heading = 0
basic.forever(function () {
    heading = input.compassHeading()
    if (heading <= 22.5 || heading >= 337.5) {
        images.arrowImage(ArrowNames.North).showImage(0)
    } else if (heading > 22.5 && heading <= 67.5) {
        images.arrowImage(ArrowNames.NorthWest).showImage(0)
    } else if (heading > 67.5 && heading <= 112.5) {
        images.arrowImage(ArrowNames.West).showImage(0)
    } else if (heading > 112.5 && heading <= 157.5) {
        images.arrowImage(ArrowNames.SouthWest).showImage(0)
    } else if (heading > 157.5 && heading <= 202.5) {
        images.arrowImage(ArrowNames.South).showImage(0)
    } else if (heading > 202.5 && heading <= 247.5) {
        images.arrowImage(ArrowNames.SouthEast).showImage(0)
    } else if (heading > 247.5 && heading <= 292.5) {
        images.arrowImage(ArrowNames.East).showImage(0)
    } else if (heading > 292.5 && heading <= 337.5) {
        images.arrowImage(ArrowNames.NorthEast).showImage(0)
    }
})
When you download it, the Micro:bit will first ask you to tilt the device in a bunch of different directions to fill the led screen with bright dots. When the screen is completely lit, the Micro:bit will have enough information to calibrate the compass, and it will know where Magnetic North is.
After that, you will see an arrow that always points to within 22.5 degrees of Magnetic North.